Custom component development
The foundation of the swingweb framework is to allow the developer to customize how a component render and accept input.
With this foundation, a lot of default implementation of most commonly used component in java.awt.* and javax.swing.*
package are also provided with the swingweb distribution so that the developer can focus their attention on the application development
right away. However, there would be occasions that the developer would need to control the look and event behavior of a component.
This section shows you how to implement custom render and event input for a component.
Component Render Development
In Swingweb, each component uses one or more jxptemplates to render the corresponding web
presentation of the component to the web. The templates are collectively grouped to be a template set. For example, the
"common" template set is a collection of templates that contains default html/css/javascript representation for the
components in java.awt.* and javax.swing.*.
The Configuration
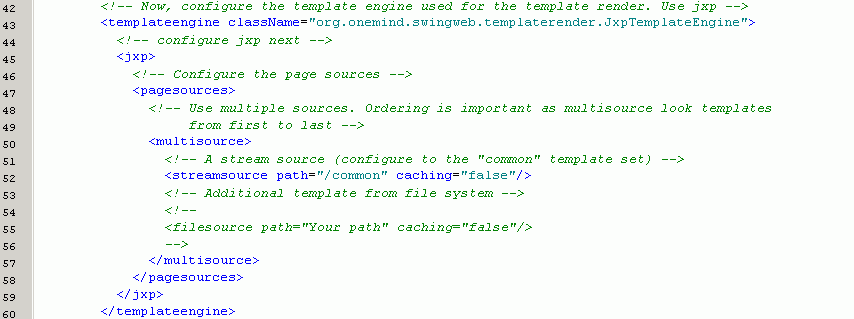
The templates are associated with the components through the following setting in
Swingweb configuration: (full configuration can be found in the distribution under
samples/config/WEB-INF/classes/swingweb-config.xml)
 line 43:
 Swingweb is using
jxp template engine (we will get to jxp syntax later).
line 50: multisource means that there can be multiple template set.
line 52: configures the "common" template set. streamsource means the templates are loaded from classpath
(using ClassLoader.getResourceAsStream()) with "common" as prefix.
For example, for java.awt.Component, Swingweb will look for the template "/common/java/awt/Component.template"
in classpath resources to render the component. The caching attribute control whether jxp template engine to cache parsed
syntax which will speed performance. But if you are doing template development, you can leave this off so that it will reparse
your template file everytime so you don't have to restart the webserver to test your new changes on the template
line 55: example configuration the uses filesource, which loads templates from file system path. For example, if you want to development
a template (e.g. com/acme/MyButton.template) for "com.acme.MyButton" which resides in /home/joe/my-template-set,
you can configure a filesource with prefix "/home/joe/my-template-set" so that Swingweb will pick up the template for
rendering MyButton.
One thing to note is that the templates are resolved by the order they appears in the multisource.
E.g. if you want to replace the presentation of java.awt.Button with your own template, you need to configure the
filesource/streamsource before line 52 which configure the "common" template set.
The template
As an example of a jxp template, the template in "common/java/awt/Label.template" looks like this:

As you can see from the template, a jxp template is basically a file with a mix of text/java code (like jsp except several differences).
Line 2 is the java code that uses a build-in function in swingweb template "getStyle" to get the necessary CSS style information regarding
the component. The fourth line uses html "div" to render the label with the style and the actual text in the label.
Inside the pairs of backquotes are java expressions that render to output stream.
There are some built-in variables for Swingweb component template:
|
com
|
the component to be rendered
|
|
_com
|
the BridgePeer of the component, which contains a unique id for identifying the component in a swingweb application
|
|
renderdelegate
|
the RenderDelegate of the component
|
|
context
|
the SwingwebContext
|
|
rendercontext
|
the TemplateRenderContext
|
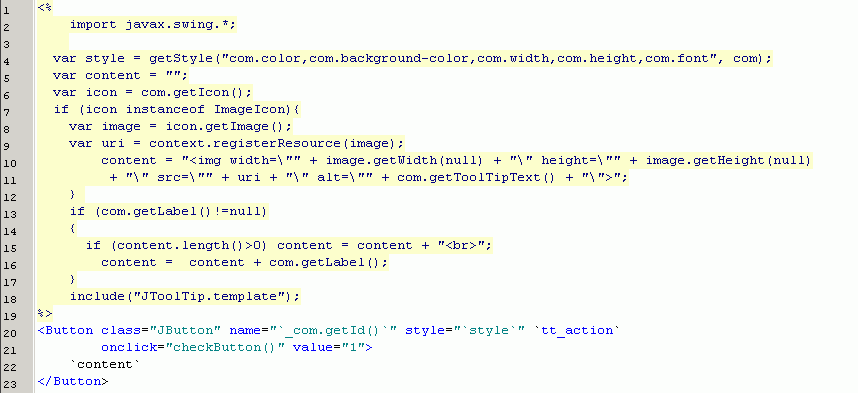
Below is a more complicated example for the template in "common" template set which is used to represent JButton
 line 2:
 how simple import in jxp is compare to jsp ;)
line 4: css style, as usual
line 8-12: register an image to context (hint: the SwingwebContext) and get an url in return to construct the img html element
line 18 : include "JTooltip.template", which return "tt_action" variable that show the tooltip
line 20-23: The actual button html. Line 21 use checkButton() javascript function that is included in "common.js"
in Frame component template
There are plenty of image buttons in
screenshots section so you can take a look.
Not much logic inside the template for a button, really. And you only need to implement it once, an all the
buttons (including all the subclasses of JButton) will just works (presentation-wise) in Swingweb.
The best way to learn developing component template is to look into the common template set (swingweb-template-common-${version}.jar)
for more interesting examples including Container, JTable, JTree etc.
Finally, there is a close relation between the presentation and the InputDelegate: the presentation must include necessary
form "input" element that will submit information necessary for the InputDeleagte expects.
Component Input development
In Swingweb, the behavior of each component is controlled by a MapInputDelegate associated with the peer of the component.
Based on the information from a java.util.Map transformed from web form/servlet request, the MapInputDelegate is responsible
to set the component to correct state and also fire necessary events to simulate the behavior of the component in the desktop
environment.
For example, when the TextFieldInputDelegate founds from the given input map that the text has been altered by
the user in the web form (passed from browser), it will first change the text in the corresponding component in the Swing
application, and then fire an ActionEvent indicating the TextField has been changed.
The configuration
An InputDelegate is glued to the BridgePeer of a Component through the following configuration:
 line 7:
 start of input delegate configuration
line 12: the default InputDelegate to use if there's none found
line 15: the class name pattern that Swingweb will use to resolve the InputDelegate of a component
line 18-19: a hard setting for the InputDelegate of a particular type of component
The implementation
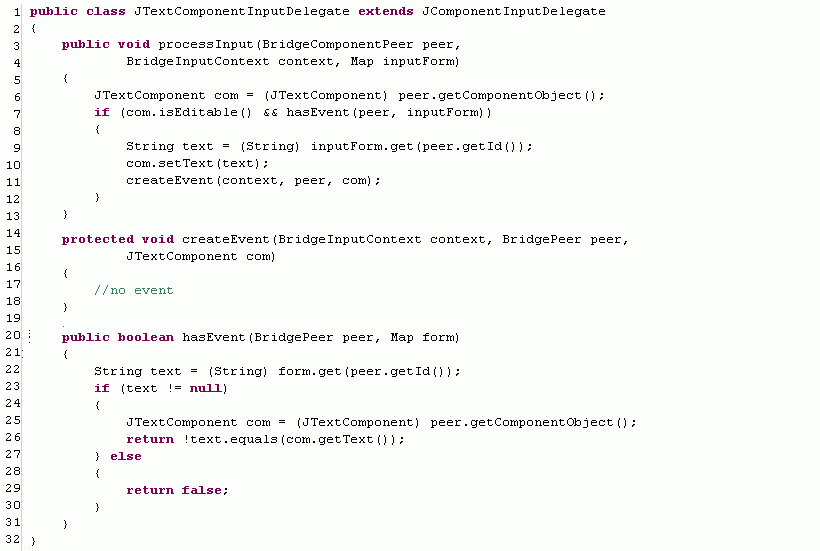
The following shows the implementation of JTextComponentInputDelegate (for JTextComponent)
 line 7:
 detecting whether there's an event on the text component using the input map (check hasEvent method line 20-31)
line 10: set the text of the component to changed text
line 11: create necessary event. In this case, none since JTextComponent does not accept ActionListener or TextListener.
Below shows how the JTextFieldInputDelegate that extends from JTextComponentInputDelegate fire events for ActionListener


